using System;
using Android.App;
using Android.Content;
using Android.Runtime;
using Android.Views;
using Android.Widget;
using Android.OS;

namespace Hello_Xamarin
{
    [Activity (Label = "Hello_Xamarin", MainLauncher = true)]
    public class MainActivity : Activity
    {
        int count = 1;

        protected override void OnCreate (Bundle bundle)
        {
            base.OnCreate (bundle);

            // Set our view from the "main" layout resource
            SetContentView (Resource.Layout.Main);

            // Get our button from the layout resource,
            // and attach an event to it
            Button button = FindViewById<Button> (Resource.Id.myButton);

            button.Click += delegate {
                button.Text = string.Format ("{0} clicks!", count++);
            };
        }
    }
}
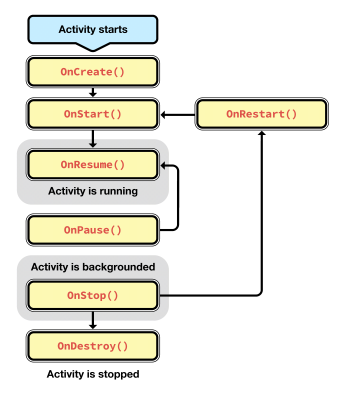
코드를 살펴보면 Activity 클래스가 있는데, 이게 안드로이드 앱에서 UI를 구성하는 기본 클래스라고 한다.(Windows 앱의 Page같은 개념) 그리고 OnCreate라는 메소드를 오버라이드해서 Activity가 생성되었을 때 버튼을 찾아 클릭 핸들러를 추가하는 코드를 볼 수 있다. 아래 그림은 Activity의 Lifecycle 메소드들을 나타낸다.(참고)
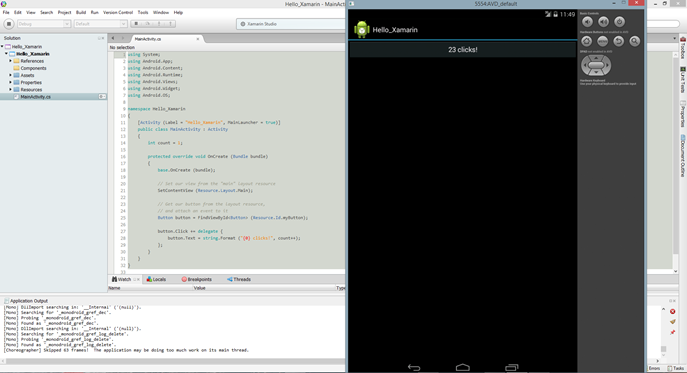
이 앱을 실행해보면 아래와 같이 버튼이 하나 있고, 버튼을 클릭하면 버튼 텍스트에 클릭 횟수가 나타나며 하나씩 증가한다.
다음은, 기본 템플릿 UI 대신 MainActivity.cs의 onCreate 부분을 수정해서 코드로 UI를 생성하는 부분이다.
base.OnCreate (bundle);

var layout = new LinearLayout (this);
layout.Orientation = Orientation.Vertical;

var aLabel = new TextView (this);
aLabel.Text = "Hello, Xamarin.Android";

var aButton = new Button (this);
aButton.Text = "Say Hello";
aButton.Click += (sendor, e) => {
    aLabel.Text = "Hello from the button";
};
layout.AddView(aLabel);
layout.AddView(aButton);
SetContentView(layout);
약간 번거로운 것은 문자열 리소스를 등록하고 사용하는 방법인데, Resource/values/Strings.xml 파일에 다음과 같이 문자열 리소스를 등록하면,
<?xml version="1.0" encoding="utf-8"?>
<resources>
    <string name="hello">Hello World, Click Me!</string>
    <string name="helloButtonText">Say Hello</string>
    <string name="helloLabelText">Hello Xamarin.Android</string>
    <string name="app_name">Hello_Xamarin</string>
</resources>
다음과 같이 Resource.designer.cs 파일이 자동으로 생성되어(수동 수정 불가) 리소스에 대한 int 값을 할당하고,
public partial class String
{
    // aapt resource value: 0x7f040000
    public const int helloButtonText = 2130968576;

    // aapt resource value: 0x7f040001
    public const int helloLabelText = 2130968577;

    private String()
    {
    }
}
aButton.SetText(Resource.String.helloButtonText);
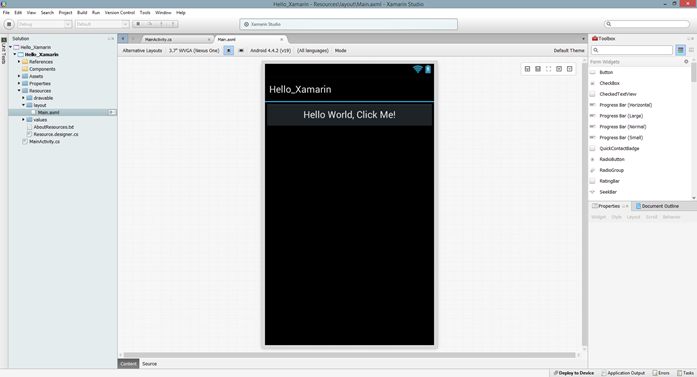
문자열 리소스를 등록하는 것과 유사하게 UI도 axml 파일로 생성하여 Resource로 사용할 수 있다. 앞서 Resource.Layout.Main을 호출해서 사용하였듯이, Main.axml에 작성된 UI가 Resource.designer.cs 파일에 자동으로 등록이 되고, 이를 Resource.Layout.Main으로 호출하는 것이다.
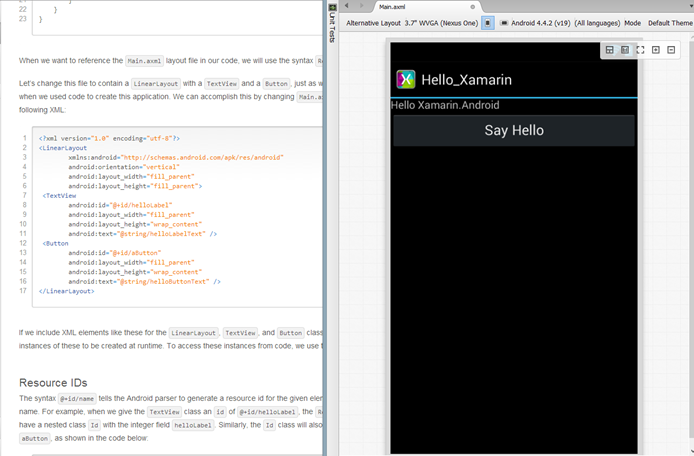
좌측의 axml 코드가 우측과 같이 표현된다. @string/helloButtonText와 같이 디자인 타임에 문자열 리소스를 사용할 수 있다. axml에 사용된 LinearLayout, TextView, Button 등은 런타임 중에 인스턴스가 생성되서 코드로 접근 가능하다.
@+id/helloLabel이라는 코드도 보이는데, 이 것은 Resource에 Id 클래스를 생성하고 helloLabel이라는 고유 int 상수를 생성하여 이를 코드에서 접근할 수 있도록 해준다. 즉 Resource.designer.cs에 다음과 같이 Id클래스를 자동으로 생성한다.
public partial class Id
{
       // aapt resource value: 0x7f050001
       public const int aButton = 2131034113;

       // aapt resource value: 0x7f050000
       public const int helloLabel = 2131034112;

       private Id()
       {
       }
}
그래서 결과적으로 이렇게 작성한 Strings.xml, Main.axml을 이용해서 OnCreate 메소드를 다음과 같이 간단하게 수정할 수 있다.
protected override void OnCreate (Bundle bundle)
{
    base.OnCreate (bundle);

    SetContentView(Resource.Layout.Main);

    var aButton = FindViewById<Button> (Resource.Id.aButton);
    var aLabel = FindViewById<TextView> (Resource.Id.helloLabel);

    aButton.Click += (sender, e) => {
        aLabel.Text = "Hello from the button";
    };
}
